


- 12 November, 2026
- 14
- 0
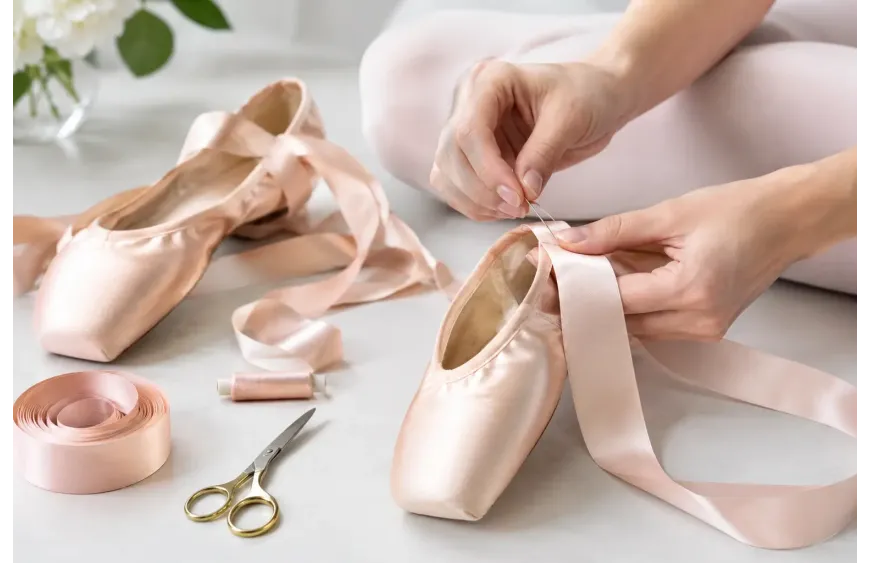
A ribbon that slips, twists, or pulls at the heel can distract a dancer through every tendu and relevé. Learning how to sew ballet ribbons correctly gives pointe shoes the tidy, supportive finish they need while helping the dancer feel secure at the ankle. It is a small sewing job, but placement matters as much as the stitch itself.
Before starting, make sure the pointe shoes have been fitted properly and are ready to wear. Ribbons cannot correct a shoe that is too long, too narrow, or unsupportive through the box and shank. They are there to hold a well-fitted shoe neatly to the foot.
What you need before sewing ballet ribbons
Set up on a clean, flat surface with both shoes facing the same direction. You will need pointe shoe ribbons, a hand-sewing needle, strong thread that matches the shoe lining or ribbons, sharp scissors, pins or clips, and a thimble if you prefer one. A fabric pencil can also help mark placement, although a pin is often enough.
Most dancers use two ribbon lengths per shoe, one for each side of the ankle. Satin ribbons are traditional and create the polished appearance expected for class, rehearsals, examinations, and performances. Some dancers prefer stretch ribbons because they give slightly as the ankle moves. Stretch ribbons can feel comfortable and reduce pressure, but they may not offer the same firm, classic hold as non-stretch satin. Your teacher’s preference and the dancer’s individual foot shape should guide the choice.
Use thread that is strong but not bulky. Heavy thread knots can rub the foot, while weak thread can break when the ribbons are pulled snugly. Avoid sewing through the outer satin of the pointe shoe. Stitches should catch the inside lining only, so the exterior stays smooth and the shoe retains its finished look.
How to sew ballet ribbons in the right position
The usual placement begins at the side seam where the heel meets the quarter of the shoe. Fold the heel of the shoe forward toward the vamp. This creates a clear crease along the inside lining. Position the end of one ribbon along that crease, with the ribbon angled slightly forward toward the toe rather than standing straight up.
That forward angle is essential. A ribbon sewn too far back can slide down the heel or feel unstable. One sewn too far forward may restrict the ankle and create an uncomfortable pull over the front of the foot. The correct position gives the ribbon a natural path around the ankle when tied.
Place one ribbon on the inside of the shoe and one on the outside. Repeat the process carefully on the second shoe, checking that both pairs mirror each other. It is easy to accidentally place the ribbons at different heights, especially when sewing one shoe at a time. Laying the shoes side by side before stitching helps keep them even.
Prepare the ribbon ends
Cut the ribbon lengths evenly if they were not pre-cut. Leave enough length to wrap around the ankle and tie securely, with modest tails that can be tucked in. Too-short ribbons are difficult to tie safely. Excessively long ribbons create unnecessary bulk and can look untidy.
To prevent fraying, gently seal each cut end according to the ribbon material. Many dancers briefly pass a satin edge near a flame, not through it, to melt the fibers slightly. This should always be done by an adult or with close adult supervision. Keep the heat well away from the pointe shoes themselves. A fray-preventing fabric product is another option.
Fold under about half an inch of the end that will be sewn into the shoe. This creates a clean edge and gives the stitches a stronger section of ribbon to hold. Place the folded end flat against the inside lining, with the finished side of the ribbon facing upward.
Stitch the ribbon firmly, not heavily
Pin or clip the ribbon in place. Thread the needle with a manageable length of thread and knot the end. Starting inside the shoe, take small stitches around the edges of the folded ribbon end. A rectangle, square, or neat box with a diagonal cross all work well. The goal is to distribute tension across the ribbon rather than relying on one line of stitches.
Keep every stitch within the lining. Do not pierce the drawstring casing at the top of the shoe, as this can interfere with the drawstring or weaken the edge. Also avoid stitching through the satin outer layer. When the shoe is worn, the sewn section should sit flat against the lining with no raised knots pressing into the foot.
Finish with a secure knot on the inside of the lining, then trim the thread close to the knot. Give the ribbon a gentle tug. It should feel firmly attached without shifting, but the lining should not pucker. Repeat for the remaining three ribbon attachments.
Add elastic if the dancer needs extra security
Some dancers sew a short piece of pointe shoe elastic across the heel in addition to ribbons. Elastic can help keep the heel of the shoe in place, particularly for narrow heels, highly arched feet, or younger dancers who are still learning to tie ribbons consistently. It does not replace correct ribbons or correct fit, but it can provide useful support.
A common approach is to sew one end of the elastic near the side seam and test the shoe on the foot before attaching the other end. The elastic should lie comfortably around the back of the ankle without digging in or pulling the heel cup down. Because the right tension varies from dancer to dancer, testing before sewing the second end is worth the extra minute.
For dancers using elastic ribbons, separate heel elastic may not be necessary. It depends on the shoe, the foot, and the guidance of the teacher or fitter. More elastic is not automatically better. Too much tension can limit ankle movement and make the shoe harder to work through.
Tie the ribbons correctly before class
Sewing is only half the job. To tie the ribbons, put on the shoe and cross the inside ribbon over the front of the ankle, then wrap it around the back. Bring the outside ribbon across the front and around the back in the opposite direction. The ribbons should meet on the inside of the ankle, just above the ankle bone.
Tie a flat knot rather than a bow. A bow can press into the ankle, show through tights, and come loose more easily. Tuck the ribbon tails neatly under the wrapped ribbons. The finished wrap should feel secure but should not create numbness, tingling, or deep indentations in the skin.
If a dancer repeatedly feels pressure at the front of the ankle or sees ribbons slipping toward the heel, check placement before simply tying them tighter. A small change in the attachment angle often solves the issue more effectively than extra tension.
Check your work before dancing
Walk, rise to demi-pointe, and perform a few controlled relevés in a safe space before taking the shoes to class. Look for lifting at the heel, twisting ribbons, loose stitches, or uncomfortable pressure points. New ribbons can feel stiff at first, but sharp rubbing or restricted circulation is not something to ignore.
Inspect the stitching regularly, especially during intensive rehearsal periods. Sweat, repeated tension, and frequent tying all put stress on the attachment points. Re-stitch any loose edge before it becomes a fully detached ribbon at the studio or backstage.
For younger dancers and parents preparing a first pair, it can help to bring the shoes and ribbons to a fitting appointment or ask a teacher to check the final placement. At Dancewear Champions, proper fit guidance is part of helping dancers leave ready for class, not just with the right products in hand.
A neatly sewn ribbon should disappear from the dancer’s attention once class begins. When the shoe stays secure, the ankle can move freely, and the finish looks clean, the dancer is free to focus on technique, musicality, and the joy of dancing.
Tags Ballet Ribbons, Ballet shoes, Ballet Point shoes, Point shoes, Silicon Toe Pads for Ballet Pointe shoes
Related Products
Ballet Pointe Shoes
$75.00CAD

Sale
Silicon Toe Pads
$25.00CAD $20.00CAD